Pages

Thursday, November 30, 2017

Studio Time: Knitting with Multiple Colors

I have a couple of favorite designers where I've learned some major knitting skills through knitting their designs. Their designs are challenging and interesting and the results are beautiful and elegant. 

Kate Davies is the designer of this gorgeous Epistropheid hat in fair isle style of knitting. My learning curve has taken a steep turn and I'm ravenous for challenging and complex knits. So I dove straight into fair isle knitting. I looked up various suggestions on how to knit fair isle. 
Researching fair isle knitting, I stumbled across double-knitting.

So, I did Epistropheid as a fair isle knit. It ended up being a very quick (two nights, total 12 hours) knit because I knit two-handed. Love knitting two-handed! Allows me to benefit from knowing both English and Continental style and speed up the process. Plus, I love the result of the hat. I still need to block it to allow the stitches to bloom out. 


My absolute favorite part of the hat is the top 9-point snowflake. So gorgeous. Such a clever design.


Even more importantly, I'm super proud of the neatness of the "wrong side" of the fair isle knit. The floats are tidy. Almost tidy enough to wear it wrong side out! But again I credit the two-handed approach to making this turn out so well. When I started fair isle, I was knitting both colors from the left hand and it was twisting the colors up. Once I started holding the contrast color in my right hand, the floats became much more consistent and the tension was also consistent (a key to the floats and proper tension). 


Now I've decided to take the challenge to the next level and do the Epistropheid design in double-knitting. It's definitely a mental challenge. One that I'm enjoying so far even though I've already frogged and re-knit this twice. Recovering from mistakes is much harder so I've been knitting more slowly. 


The last two-color knitting I'm going to conquer is the brioche stitch. I'm not super convinced I like this stitch yet. I think it probably has to do with the color combo. If I choose a color combo that I love better, I might like it a little more. I have some designs favorited in my Ravelry that are a little more intriguing than straight brioche. 


Monday, November 20, 2017

Artfully Meandering: Down the Knitting Rabbit Hole - My First Sweaters

I blame Irma.

Well, I started falling down the knitting rabbit hole before Irma, but Irma clinched it. Nothing like evacuating to Alabama and having four days to focus on knitting.

I finished...frogged and re-knit my very first sweater. This is the Old Town sweater from Sunday Knits. This one took six weeks.


And then I went and knit a version in white for my niece. It was originally supposed to be for my sister, but I used a thinner yarn (smaller gauge) so it fits my niece better. This one took two weeks.


And now I have three four projects (two baby blankets, a scarf, and a hat) at the moment with a few others percolating in my head cast on my needles.

I knit my first pullover sweater in linen. This is gorgeous Prism Euroflax Linen yarn. I had a skein of this yarn in my stash when I decided to take on this sweater. I ordered two additional skeins from Desert Designs Knits to complete the sweater. Normally different dye lots can create a very jarring transition, but it worked out okay with this sweater. And I'm SUPER happy with the result of this sweater. In fact, I have a request to make one for another friend.  I've been able to machine wash this in super delicate and dry on delicate and it turns out perfectly. It's getting softer and drapey-er with each washing.


I've been pairing the sweater with another Sunday Knits item - the Sonoma Stole is perfect for the slightly cooler in between weather for a Florida winter. I get to wear my warmer knits!!!


While learning to knit with linen, here is a list of references that have helped me.

Here are the linen posts:
http://fluffyknitterdeb.blogspot.com/2006/06/l-is-for-linen.html
http://untangling-knots.com/2016/05/20/6-things-to-know-about-knitting-with-linen/
http://www.knittingparadise.com/t-172115-1.html
https://marvelknits.wordpress.com/2015/06/11/knitting-with-linen-technicalities/
http://www.ravelry.com/groups/linen-and-hemp-lovers
http://knitbot.com/blog/2013/5/9/knitting-with-linen
http://knitbot.com/blog/2013/5/22/finishing-with-linen
https://www.interweave.com/article/knitting/knitting-with-linen-yarn-and-knitscene-summer/
https://www.youtube.com/watch?v=BaPdU20WdzQ


Adding lining to a knit piece:
http://techknitting.blogspot.com/2008/05/best-way-to-attach-lining-fabric-to.html


And a side note on a cool stitch called the Linen Stitch for future knitting...


Tuesday, August 22, 2017

Studio Time: Kanna Earring Designs

Current earring designs I can re-create in either glass or polymer clay. If you need light earrings, I recommend polymer. If you like the beauty of glass and can handle a little bit of weight, then go for the glass.

1. Simple Drop ($18 Retail)


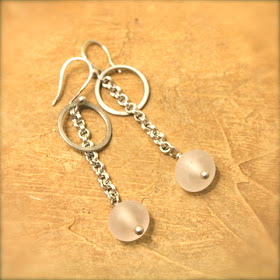
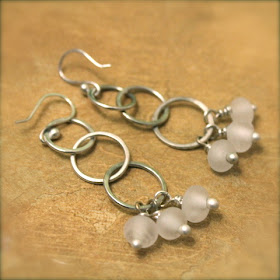
2. Loop and Triple Drop ($35 Retail)

3. Cherry Blossom ($47 Retail)

4. Lagoon ($35 Retail)

5. Lasso and Lariat ($47 Retail)

6. Graduated Drops ($22 Retail)

7. Stacked Loop and Triple Drop ($41 Retail)

8. Icicle and Drop ($47 Retail)

9. Twig ($59 Retail)

10. Cascading Droplets ($35 Retail)

11. Byzantine Chain with Large Bead ($47 Retail)

12. Rope and Bead ($39 Retail)

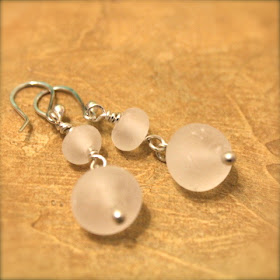
13. Triple decker small bead ($29 retail)


14. Endless Summer ($24 Retail)

15. Simple Silver and Bead ($24 Retail) - sunstone variation

15. Simple Silver and Bead ($24 Retail) glass bead variation

16. Confetti ($69 Retail) - Glass and carnelian variation

16. Confetti ($69 Retail) - Glass and carnelian variation

16. Confetti ($69 Retail) - Flamenco Variation 

16. Confetti ($69 Retail) - Pink Swarovski Crystal and glass bead variation

16. Confetti ($69 Retail) - Green peridot and dyed shell variation


Monday, May 1, 2017

Studio Time: Going to Bead College (aka the 10,000 Bead Project)

I was talking about my 10,000 Bead project with a fellow artist (Brenda) and what I was learning as I went along. By making the same beads over and over again and not doing any complex designs yet, I'm learning the nuances of my tools and supplies. Her comment, "Oh! You're sending yourself to Bead College!" I guess I am! Right now I'm working on my Associates Degree, in other words learning the basics and setting a foundation. 

For example, I'm learning how to use my torch effectively, getting less scared of lighting it, learning the value of adjusting the PSI on both the propane tank and the oxygen concentrator. I'm learning the difference between neutral, oxidizing, and reducing flames. I learned about reducing flames through a painful 37 Bead mistake. 


I'm also learning how to pay attention to safety issues and correcting them immediately if something seems off.

Another side effect of this project is that I'm learning the nuances of the glass. I'm making the same beads over and over again. I'm learning which glass tends to shock easier and how to manage shocking. I'm learning to extend my glass stash by fusing rod ends onto new rods to use up as much as possible.  I'm learning which types of glass work quickly or slowly and how to adjust my torch accordingly. For example I find ivory to be some of the softest glass and need to work it in a cooler flame to retain more control over it. These are the beads that go the most "organic" on me. Also I was trying to work faster by working with a hotter flame. I actually found I could work faster with a cooler flame since it didn't make the glass as molten and I could control the shape through gravity better. 


Another example is through making the same bead up to 100 times. Here is an example of the progression of making disk beads from early tries to middle improvements to final solid designs. I have to confess I love the shapes and texture of the beginner beads. I hope to be able to retain the ability to keep the texture even when I'm more skilled. 

Beginner beads. These are being held back.


 Better....


Best....so far.... the more I make, the more I learn, and the more I enjoy it.


Wednesday, April 12, 2017

Studio Time: Starting a big project

I've started a project I'm calling the "10,000 Bead Project." Right after I committed to that in my mind and to my coach, I got accepted into the Milwaukee Bead & Button Show! This is huge for me. I've been applying to juried shows and this is the first one I've been accepted into. And, this is a huge opportunity since it's focused exclusively on beads and buttons! 

I got the good news at the end of February, so March was about refining my designs and choosing a number of design to productionize. I was busy making beads in March, but I realized my approach was seriously inefficient. I looked at my pile of ideas (below) and chose designs to turn into production sets. 

Polymer Clay

I continue to explore the Texture & Patina theme and bring it into my work below. I create bi-color and tri-color carved beads and coordinating spacers.


I've also been experimenting with leaf and the patina...


And large carved focal beads. These are some of my favorite so far.


Lampwork Glass Sets

My first forays into making glass beads were very disappointing. I had forgotten so much about lamp working! I scorched my first batch of 37 beads. While they are still interesting, it was a huge disappointment, especially because I know they're "wrong" ... i.e. I didn't do this intentionally. I was really hoping to get the beautiful glass colors. My next small attempt was MUCH better (next photo and the real colors you should be seeing.)


So, the lesson was: I was working in a reducing flame (which is too much propane). I had forgotten how the flame should look. I didn't have the pressure up high enough on the oxygen either so I was working really really slowly. I ended up ordering a new, bigger torch. That has also been a learning experience, but as I'm learning by repeating the same bead over and over again, I'm getting much deeper and nuanced experience in the tools. I'm learning how to get the flame hotter, how to keep the flame a little cooler so I can work slower. I'm learning where to point the torch so it doesn't get clogged if glass shocks and gets stuck to the torch. I'm learning how to clean the torch if a small piece of glass does get stuck. I'm learning the pressure of the my oxygen concentrator and propane canister.

I am writing this as a lessons learned for the month of March. I needed a month to experiment and nail down the designs I could make into production sets (multiples of the same beads). I needed the time to learn my tools and improve my techniques.

Now that I have about 2,000 beads of production under my belt, I feel more confident about attending the Bead & Button show as an exhibitor! As I've reviewed the current body of work I've been collecting, I realize it's all very basic. But, basic techniques are the foundation of any good artist. That's a subject for the next post!

Sunday, February 5, 2017

Studio Time: A collection of my best work

Attached is a body of work in lamp work glass beads and polymer clay beads from 2009 - 2017. 

My beads are simple and basic and I make a lot of my own beads into jewelry. I describe my style as organic and textural. I don't do a lot of focal beads. I create a lot of basic beads that are the foundation of most pieces of jewelry.

Patterned Beads - Lampwork Glass
Dots and reactive

Giraffe

Giraffe


Dots

Quirky Dalmation dots with Red

Simple dots


Textural nuggets and basic rounds


Swirls Beads

I created a technique for creating messy swirls of color. I mix opaque, opalescent, and translucent colors. Sometimes I do a simple mix of 2 colors up to 4-5 colors.


Polymer Clay

These are carved polymer clay beads that were a breakthrough design for me that allowed me to combine my glass with polymer.


Most of these beads are made with polymer clay and alcohol inks.